Friday, 20 February 2015

Blue Asian Bridal Makeup

Hey guys! Here's another bridal look using blues. Of course you don't have to be a bride to try out this look. However, it is a very heavy look so best suited for parties and evenings.


1. Prime
For strong looks like this you should always use a primer to hold all the products in place. Use a primer (UD primer potion) all over the lid, up to the brows.

2. Crease
  • With a blending brush apply a light brown transition colour (MAC's Texture) to the crease.
  • Load an angle brush with any black eyeshadow cut the crease. So you're drawing in that arched line in to the crease. Then using the same brush pull up the black to blend in to the brown.

3. Base
Apply a light blue cream base (NYX pencil in Baby Blue) to the centre of the lid and spread it out using a small synthetic brush. This brush will give you the control you need to further clean out that sharp crease line.

4. Highlight
Load a flat shadow brush with a shimmery white shadow and sweep it below the brows and a little around the tear duct area. As this is a dark look, highlighting will make the colours pop.

5. Lid
Now the fun part! The shadows used are from a large unlabelled palette. But all you need are three shades of blues that transition in to each other well. 
  • Using a flat shadow brush apply an aqua blue to the inner corner of the lid, royal blue the the centre and a navy blue to the outer corner of the lid
  • All the colours should slightly overlap each other for a smooth transition.
  • Keep the shadows on the blue base, not going passed the sharp crease line.

6. Winged liner
Use a black liner of your choice and create a winged liner. 

7. Lower lash line
  • Line the water and lash line with a black pencil of your choice.
  • Smudge out that lash line with the royal blue shadow, on a pencil brush.

8. Lashes
And of course apply mascara and false lashes of your choice.

All done!!

Have fun with this look. Don't forget to subscribe and follow on facebook, instagram and bloglovin.

Thank you so much for stopping by and have a wonderful day! :)

**I am not affiliated with any of the brands mentioned on this post. These are products I have purchased myself and enjoy using**

Friday, 13 February 2015

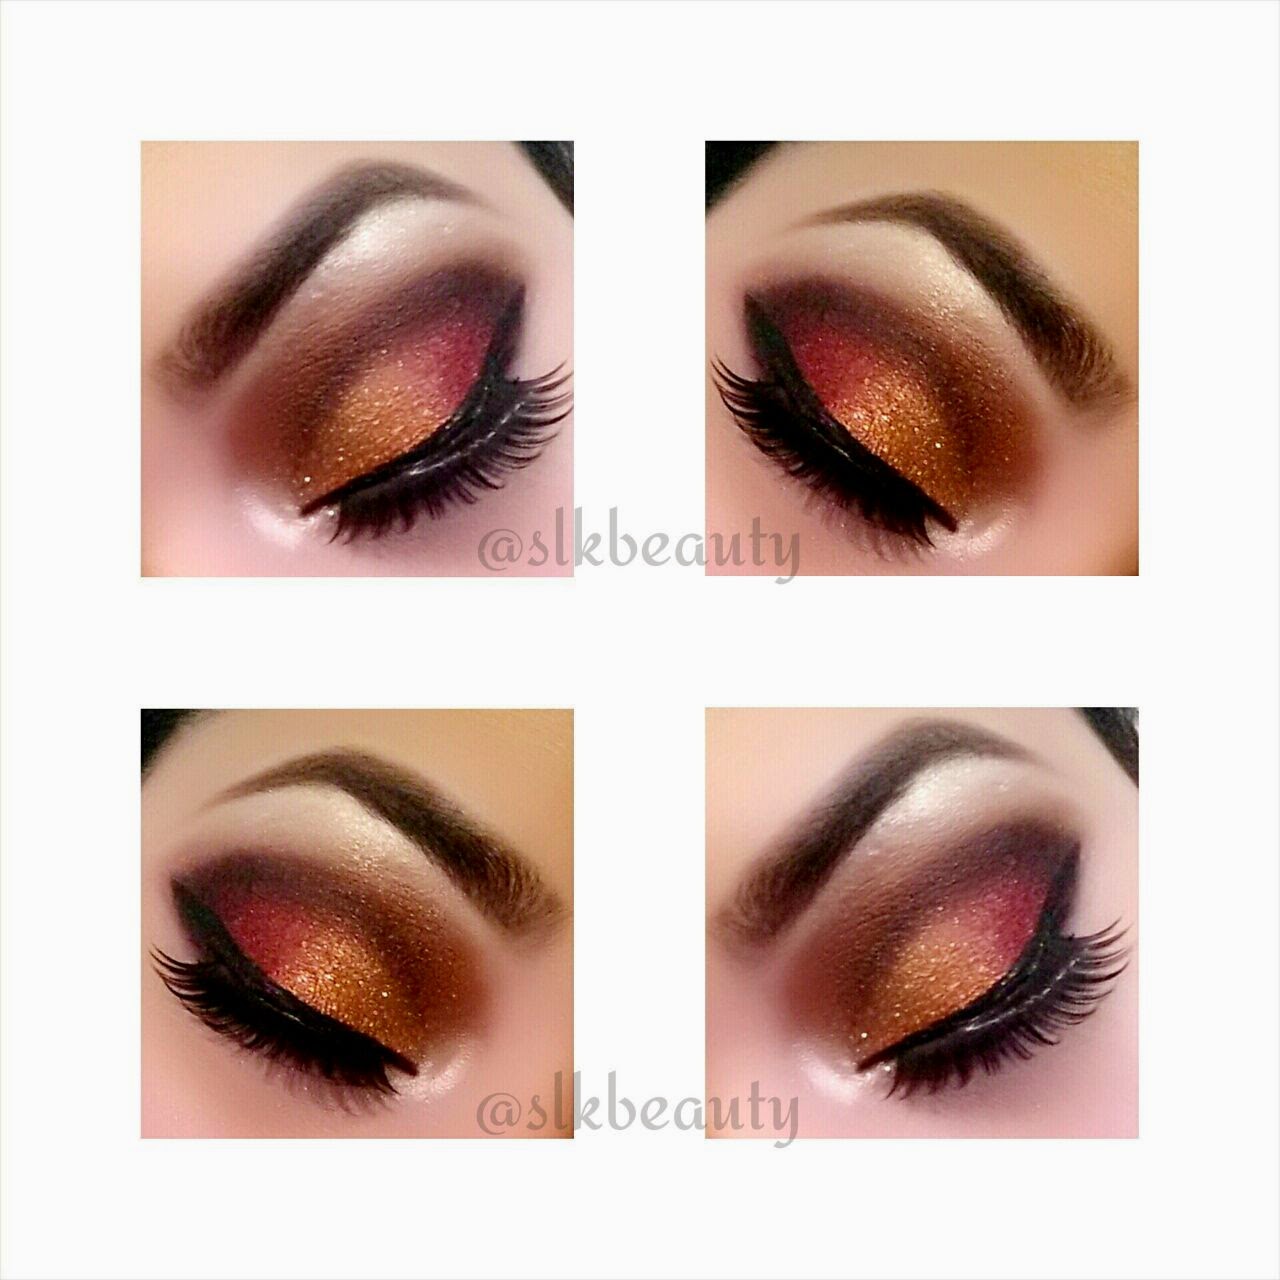
Traditional Asian Bridal Makeup

Here's what I call a traditional Asian bridal makeup. It's a very red and gold  look with a hint of glitter.


1. Prime
As always prime the eyelid, all the way to the brows (Lorac Behind The Scenes).

2. Base
You'll need a flat synthetic brush for this step
  • Apply a white (NYX pencil in Milk) base under the brows (brow bone) and carve out the brows, as well as pulling it down slightly towards the crease. But don't take it all the way to the crease.
  • Apply the same white base around the tear duct area.
  • Apply a gold base (Maybelline colour Tattoo in Gold Rush) all over the lid, up to the crease.
At this stage you should have a base on the brow bone, tear duct area and the lid. The only area that wouldn't have base is the crease.

3. Highlight
With a flat shadow brush apply a light shimmery shadow (Nude from Lorac pro palette) on the brow bone and tear duct area (over the white base).

4. Crease
With a tan eyeshadow (Sable from Lorac pro palette) on a blending brush deepen the crease. Brush it on using a windshield wiper motion, from the outer corner to the inner corner. Blend it into the highlight colour.

5. Lid
  • With a flat shadow brush apply a shimmery gold to the inner half of the lid.
  • Then apply a shimmery or matte red on to the outer half of the lid. slightly overlap the gold.
  • Using the blending brush from step 4 blend out the crease again (with no additional shadow).
6. Definition
Now we want to add more definition by further deepening the crease and the outer corner.
  • Using a pencil brush apply some black shadow to the outer corner (side ways V shape).
  • Take that black in to the crease, almost drawing in a crease as you would for a cut crease look.
This will give the lid some dimension.

7. Lower Lash line
  • With a pencil or a smudge brush apply the red to the lower lash line
  • Blend it out using the tan blending colour.
8. Liner
  • With a liner brush of your choice draw on the winged liner. Create a wing, taking it to the crease level.
  • Apply the same gel liner to the water line and the lower lash line, all the way to the inner corner
9. Glitter
For this look I didn't go too crazy with he glitter, as I wanted the red to be the star of the show. So take a tiny amount of glitter on to your ring finger and apply just over the gold shadow.

10. Lashes
  • Apply mascara to the lashes
  • Put on lashes of your choice

All done now!

Do let me know if you try this look out and if you've found this easy to follow.

Thank you so much for stopping by. Have a great day.
xxxxxxxxxxxx :)


**I am not affiliated with any of the brands mentioned on this post. These are products I have purchased myself and enjoy using**



Wednesday, 11 February 2015

Glam Valentines Cut Crease Eye Makeup

This is a glamorous cut crease eye look with a lot of glitter. Cut crease looks are great for those with mono lids or for those of us with less defined crease area (not deep).

To create this look you'll need:
  • Eye primer
  • White base
  • Gold eyeshadow
  • Black eyeshadow
  • Dusky pink/ plummy eyeshadow
  • Campaign/ shimmery off-white eyeshadow
  • Gold glitter and adhesive
  • Black eyeliner (liquid/ gel and pencil)
  • Lashes & glue
  • Brushes; Flat shadow brush, blending brush, angle brush, pencil brush, small synthetic brush


1. Prime
Apply eye primer all over the lid up to the brows.

2. Cut Crease
With a black pencil draw a very defined line through your crease, all the way to the inner corner. Smudge it upwards using a pencil brush. Do not over blend. Go in with the pencil again if you loose the intensity of the black, as we're going for a harsh line. 
Try not to take any of it on to the lid.

3. Crease Colour
  • On a blending brush take a dusky pink eyeshadow to the crease and blend up towards the brow.
  • Take a matte black eyeshadow on an angle brush and take it over that line to define it further.

4. Lid/ Base
Apply a white base (NYX pencil in Milk) to the lid. Use a small synthetic brush to spread it out and shape. In this step you can clean up the crease area and define it even further for that crisp clean line.

5. Eyeshadow 
Take a gold eyeshadow with a flat (natural fibre) shadow brush and apply it all over the lid, over the white base. Use a dabbing motion rather than a swiping motion for high intensity.

6. Glitter
Dampen a flat shadow brush with an adhesive (MAC's Fix Plus), and load that brush with some gold glitter (MAC's Reflects Antique Gold). Apply it on to the lid, with a dabbing motion. Stay under that crease line.

7. Highlight
  • Apply a light shimmery shadow under the brows and blend in to that pink blending colour for a a more diffused look. Use a flat shadow brush.
  • Take that same highlight colour and apply it around the tear duct area.
8. Eyeliner
  • Draw on the winged liner on the upper lash line, using the liner of your choice
  • Apply black eyeliner to the waterline and the lower lash line
  • Smudge the eyeliner on the lower lash line with the pink eyeshadow, on a pencil brush
9. Lashes
  • Apply mascara to both upper and lower lashes
  • Apply lashes

Hope you've all enjoyed this look and found it easy to follow.


Happy Valentines!!
(¯`v´¯) 
`·.¸.·´ 
¸.·´¸.·¨) ¸.·¨) 
(¸.·´ (¸.·´ (¸.·¨¯`♥


Thank you so much for stopping by. 
Show your support and follow me on Instagram, google+ and like my Facebook page.

**I am not affiliated with any of the brands mentioned on this post. These are products I have purchased myself and enjoy using**


Saturday, 7 February 2015

Asian Bridal Peacock Makeup


Step 1: Prime
Prime your lids to prevent creasing and insure longevity of the eyeshadow (Urban decay Primer Potion).

Step 2: Base
In many cases the primer serves as a good base. However, for a certain colour pop you'll need an additional base. For this look use a white base (NYX Jumbo Pencil in Milk), as we'll be using bright colours. Apply the white base all over the mobile lid (up to the crease).

Step 3: Eyeshadow
For this step stay under the crease for all colour application. At this stage no blending is required, just concentrate on overlapping the colours a little. You'll need a flat shadow brush for this step.
  • Apply a gold eyeshadow to the inner one quarter of the lid.
  • Apply a bright green eyeshadow to the next quarter of the lid (from the middle of the lid to meet that gold). Remember to overlap the gold a little.
  • Apply the teal blue colour to the third quarter of the lid, slightly overlapping the green
  • Apply a plummy purple to the outer "V" (the out corner of the lid, in a sideways V shape).

Step 4: Crease / Blending
This step will blend the crease area as well as deepening it.
Take that  same purple into the crease, using a Pencil brush or a small blending brush. Just lightly blend the edges of all the shadows, staying within the crease area. DO NOT over blend. 
Take this purple all the way round to the inner corner, keeping mostly concentrated (dark) in the outer corner.

Step 5: Blending / Smoking
For this step you need a matte dusky pink eyeshadow.
Use the pink on a fluffy blending brush and smoke out that purple. This will insure there's no harsh lines. Don't be afraid to take it up to your brow, but be light handed. 
Blend in a "windshield wiper motion", and follow the shape of your brow.

Step 6: Highlight
  • Using a flat shadow brush apply a shimmery champagne shadow under the brows (brow bone), and blend it into the pink.
  • Apply the same highlight colour around the tear duct area (around the inner corner of the eyes)

Step 7: Lower Lash line
  • With a Pencil brush line the lash line with the purple
  • Blend out that purple, using the pink blending shadow. Use a small blending brush or a clean Pencil brush for this.

Step 8: Liner
  • Line your waterline with a black eyeliner pencil (Urban Decay 24/7 in Perversion).
  • Using a liquid or gel liner (Stila Smudge Pot in Black) draw in the winged liner. Extend the wing to reach the crease level. Angle the wing from your lower lash line towards the end of you brows.

Step 9: Lashes
  • Apply a coat of mascara (Benefit's They're real)
  • Apply lash of your choice. Best with wispy lashes.

All done!

Hope these were easy steps to follow. Do tag me on Instagram  if you decide to do this look on yourself.

Thank you so much for stopping by. Have a wonderful day! xxx

**I am not affiliated with any of the brands mentioned on this post. These are products I have purchased myself and enjoy using**